
Walmart Listing Creation: A Walkthrough

Table of Contents
Today, we have another real-world example documenting exactly what goes into Walmart listing creation! I use the word ‘another’ because this listing has been used previously to demonstrate the workflow or process that goes behind creating an Amazon listing. Still, we will be using the same product now to show you the process of creating a listing on Walmart.
The notorious product I’m talking about is the Helium 10 backpack. I will walk you through the process, step-by-step, from keyword research all the way to optimizing your listing.
Collecting Keywords
So, we have our product and now we want our product to have a listing that attracts buyers.
How will we find keywords that people are searching for when they want to buy a similar bag?
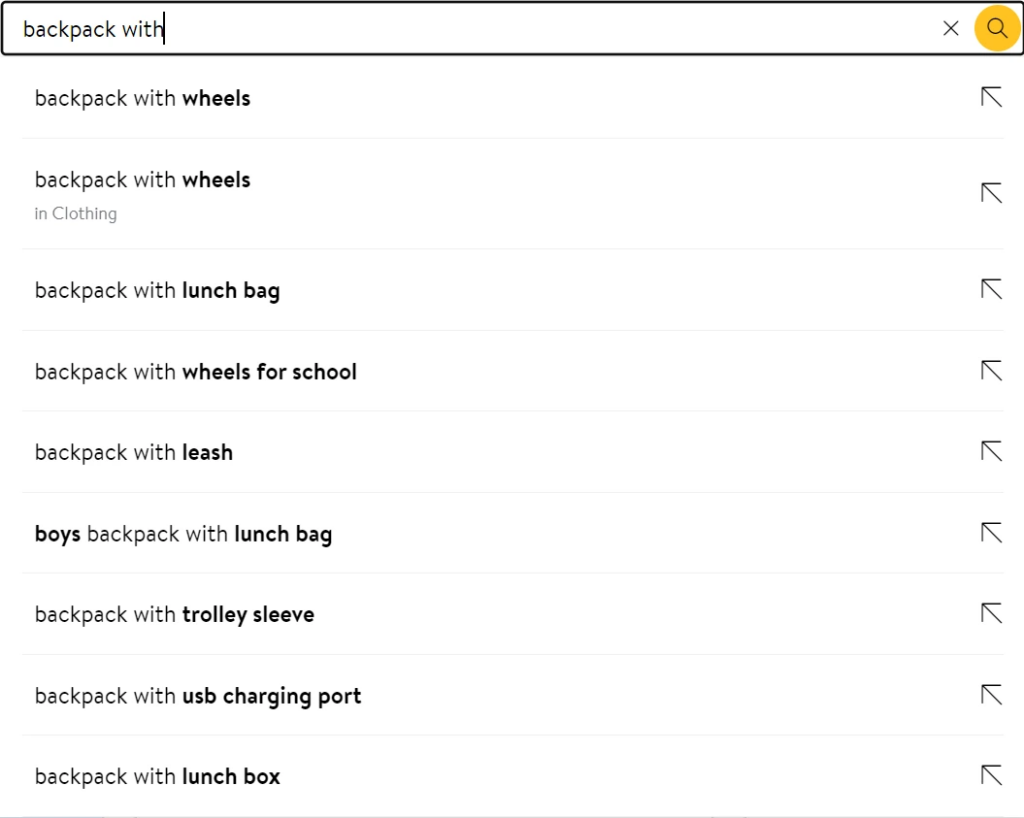
Essentially, this is a backpack with a USB port. My first step will be to go into Walmart.com and type “backpack with” to see what the auto-complete suggests. The most relevant suggestion I got was “backpack with USB charging port”.
Let’s go to Walmart.com, type in the same keyword, and run an Xray search using the Helium 10 Chrome Extension tool to identify the top 10 product IDs. You want to identify products that are most similar in form, features, within the same price range, and non-sponsored (sponsored brands have paid to be at the top of search results). If you are unsure about the price range, Xray will give you an average price that you can use as a benchmark. I usually like sorting out the results by the highest Walmart sales to see who is getting the highest market share on the platform.
Refining Keywords
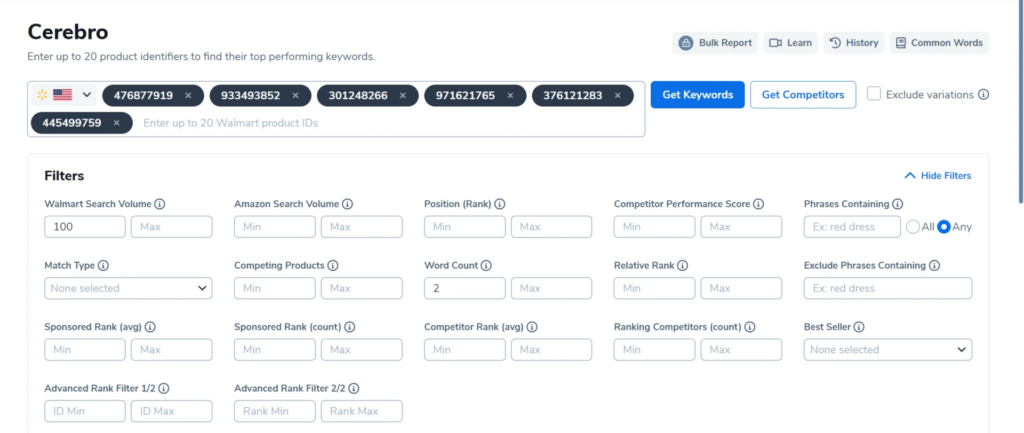
After identifying our top 5-10 competitors from Xray, I write them down. These 6 product IDs will go into the Helium 10 keyword research tool, Cerebro, (select Walmart.com in the search bar within the tool) so we can find relevant keywords. Make sure you keep these IDs handy, we will need them later to do some more research. The product IDs I chose are as follows:
476877919
933493852
301248266
971621765
376121283
445499759
These product IDs produce a very wide array of search results when input into Cerebro. To narrow things down, we will filter out the keywords based on important criteria. We want meaningful keywords that indicate opportunity to us. What is important to you? This will vary product by product, but for this specific product, our keyword goals are to:
- Get rid of basic one-word keywords
- Find the most relevant keywords that are the most searched
How do we achieve these goals? By using the following filters:
- Word Count filter at a minimum of 2
- Search Volume at a minimum of 100
The first filter will make sure we get a phrase as a keyword and not an individual word. This translates into buyer intent but you also do not want to be too specific because the keywords on Walmart are more general in comparison to Amazon. The process of searching for products on Walmart is different from Amazon, so keep that in mind.
The second filter will tell us what people are searching for the most. The higher the search volume, the more demand there is for a product and so, the higher the chances of making a sale. The range in search volume for our results was wide and we had over 500 results. Using that filter means people are searching these keywords an average of 3 times/day. Now bear in mind that this is way lower than the minimum we would have put on Amazon. This is because keywords generally have a lower search volume on Walmart compared to Amazon.
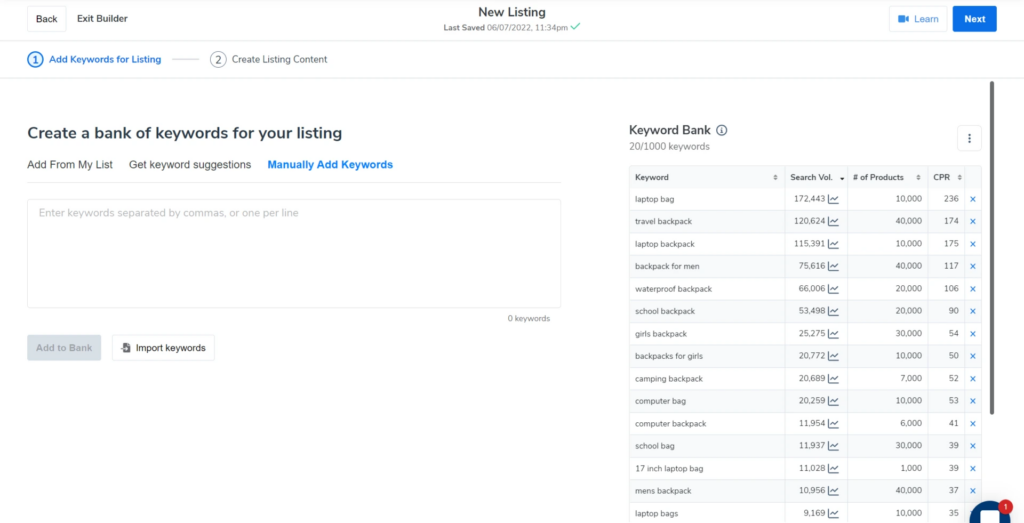
I am now down to 20 keyword phrases, which is a solid number. Ideally, you want to narrow down 10-20 keywords. Now, it’s time to select all the keywords and save them to a keyword list. This list will later be used to input directly into our listing builder.
Loading Keywords Into Your Listing
Let’s walk through each and every step inside the Helium 10 Listing Builder. First, you will choose the option saying “create from scratch”.
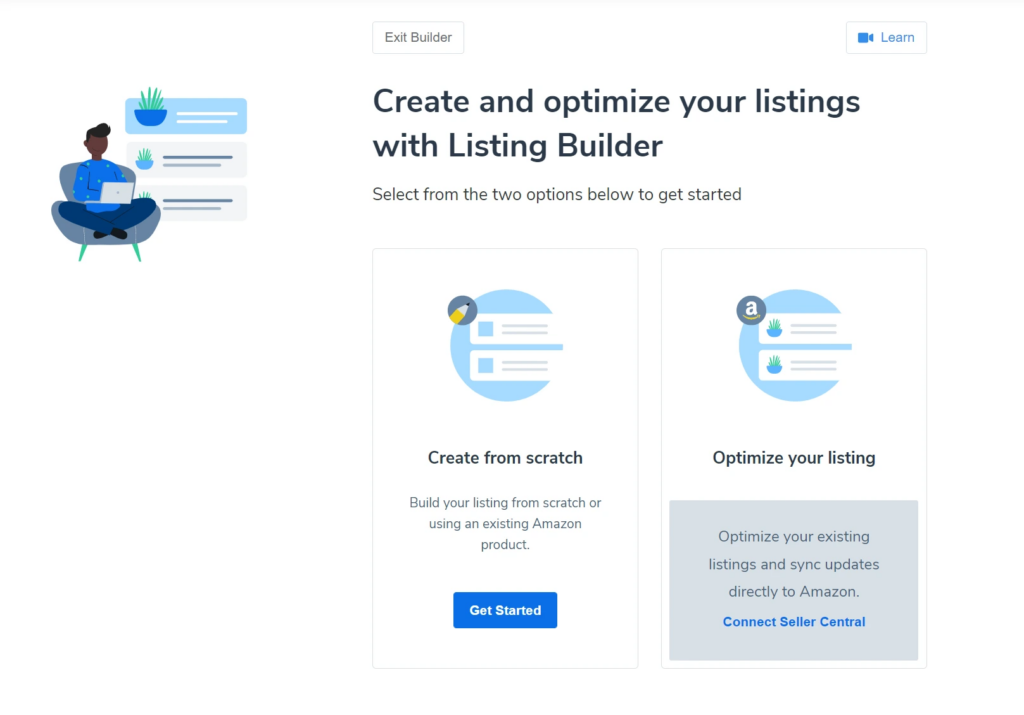
Then you will “select a marketplace.” Note, that this does not matter because you are not actually creating a listing on the Amazon marketplace. Hit the “start building” button underneath it.

Now keep in mind that Listing Builder is primarily used for Amazon listings so we are making use of Listing Builder just to stay organized and to help write a good copy.
The keywords found will be from the Walmart marketplace so they won’t appear under the “add from my list” folders. You will have to manually add the keywords in the blank space.
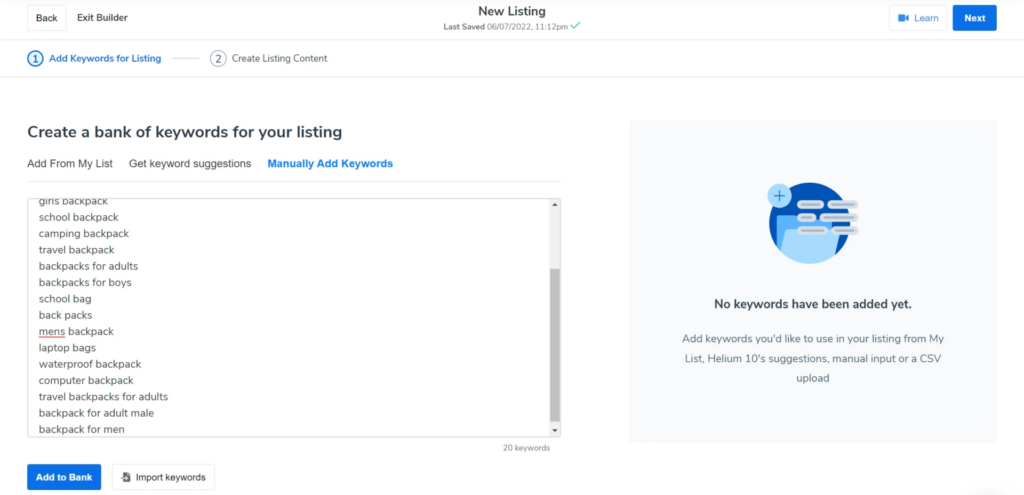
Next, hit “add to bank” and all the keywords will appear on the right-side column.
Click next and it will take you to a page for creating listing content.
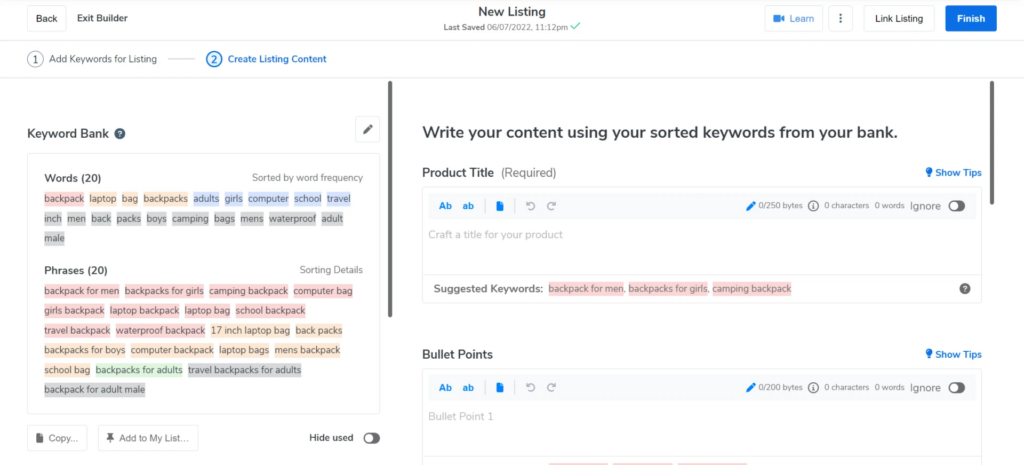
Here you will see your keywords sorted by words and phrases. Even though we only took longtail phrases, Listing Builder automatically creates a list of individual words from the list of longtail phrases. We now have a list of words and phrases available that we can use in our listing bullet points and description. We are all set up to begin writing our copy!
In general, Walmart recommends using 50 -75 characters for the product title, 80 characters per key feature, which will appear as bullets on your product page, and 150 words minimum in the description section.
There isn’t a max word limit on the description section so if you need to add some additional information, you can add it in the description section. However, these are the general guidelines and can vary from product category to category so make sure that you check the word limits before you create your listing copy.
Remember – the character limits in Listing Builder are optimized for Amazon so do not let that confuse you. Unlike Amazon, the key features are very short and precise one-liners talking about a particular feature of your product. You can click on the plus icon if you want to continue to add more than the 5 bullet point spaces that the listing builder tool has provided you with.
Let’s begin work on actually creating the listing! The title is the most important part of your listing – it can make or break your conversion rates. Here are some tips to keep in mind when writing your product title for the Amazon marketplace.
- Avoid keyword stuffing – Title text must make sense and be descriptive of your product. Don’t just blindly throw every keyword you have in the mix!
- Include long-tail keyword phrases from your keyword bank where natural – This will help you rank for those keyword phrases and capture shoppers with true buying intent.
- Title case your words and do not include any emojis or characters for decoration – Your title should be legible!
The title I came up with is as follows:
“Helium 10 17 Inch Laptop Bag with USB Charging Port and Anti Theft Pockets“
Going Beyond The Bullet Points
Finding the right keywords is important, but now you have to transform them into meaningful and well-structured sentences for your bullet points!
Keywords are critical for becoming visible to your target audience and for ranking purposes. But to hit a home run, you need to get down to the real nitty-gritty of your product. This means knowing its dimensions, the fabric being used in it, the functions it provides, its distinguishing features, etc. Add all these details alongside your keywords to your bullet points.
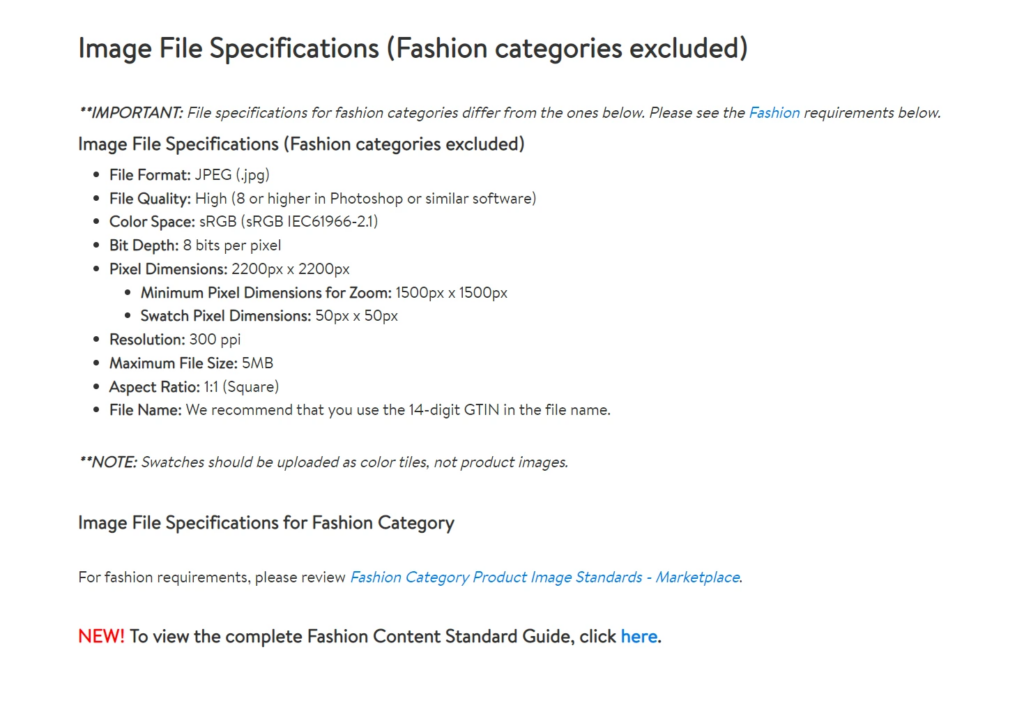
The last part of the listing is to include pictures of your product. For this, you will need a minimum of five images. Walmart displays the first five images, but in order to reveal the remaining images, a buyer has to click on the arrow. So instead of the seven minimum image requirements for a good listing on amazon, it is five images on Walmart. These five images will include your main image, infographic images, and lifestyle images. For this listing, I will be modeling myself as well as taking pictures with the help of my tripod!
Main Product Image
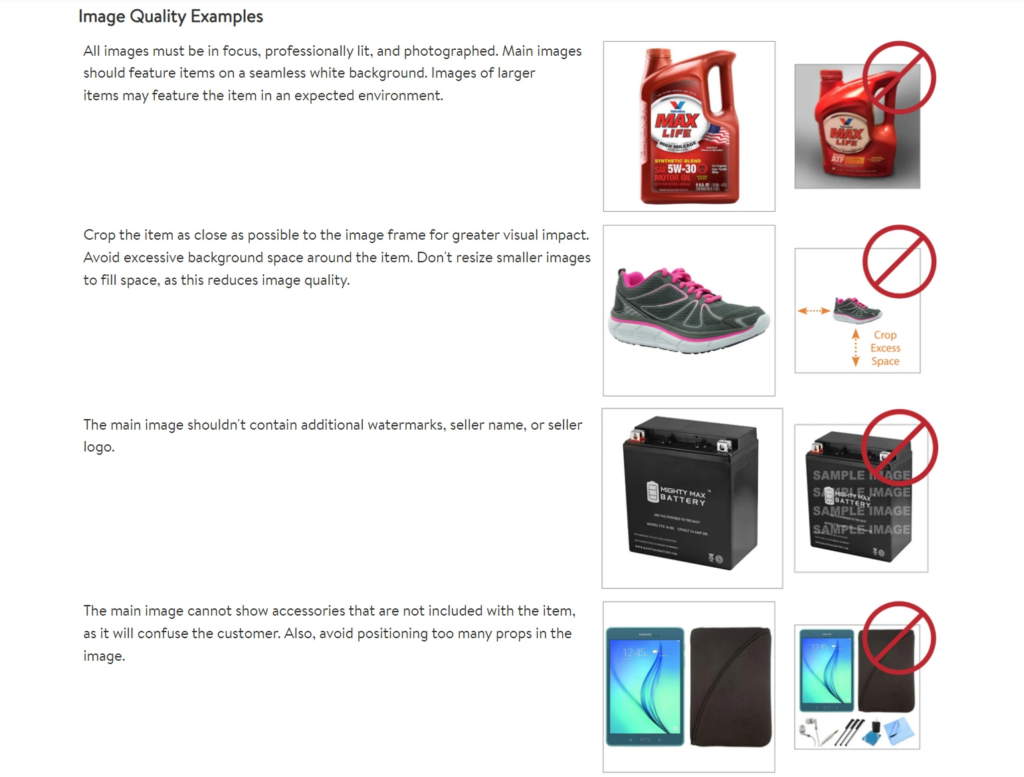
Let us begin with the main image! This image is as important as your product title when it comes to conversion rates. It is the only thing your audience will see when scrolling through a sea of listings on Walmart. Make sure you put your all into your main image while also being compliant with the Walmart TOS. Here are some things to keep in mind:
- Put your product against a white background
- Cover as much of the space in the picture as possible
- Do not put any logos, badges, or icons in this picture
- Do not include props – items that are not being sold should not be a part of this picture
- Keep it as clean and visually pleasing as possible
Infographics & Lifestyle Images
As for the split between your infographic and lifestyle images, there are many factors that go into deciding on this.
As a general rule of thumb, if there is a lot of information you need to give out about your product then you probably want to include more infographic images in your listing.
You can also determine this balance by reading reviews on your competitors’ listing pages and discerning the kind of information the customers are highlighting.
If the phrases focus more on the functionality of the product then that is what is most important to your target audience.
In my case, this is true. My product has a lot of features and my customer base wants to know about them before they make a decision on which backpack to buy. There is information, like how many pockets the backpack has or whether it is waterproof, being highlighted in the reviews so that is the information my pictures will reflect. In general, you want to follow these guidelines for all images and also check out Walmart SellerHelp for more information on the listing images.
Creating an “Image Plan”
I will create a plan for my listing images so that my photoshoot goes smoothly. It will be a busy day and I do not want to miss any important angles or shots. My image plan is usually broken down into two segments: information and aesthetics.
For the former, I take inspiration from Walmart competition, and for the latter, I take inspiration from Pinterest. You will notice in my image plan that a lot of the information I will cover in my photos will be inspired by the reviews on other Walmart listings. This will pertain to features the customer base likes or dislikes about the product and the questions they want answered by looking at your listing.
- Image #1 – White Background (Main Image)
- Image #2 – Showcase Luggage Strap & Hidden Back Pocket (Infographic) – ideal for traveling
- Image #3 – Showcase USB port and dimensions (Infographic) – charge equipment on the go
- Image #4 – Show back padding, material, and handle (Infographic) – wear as backpack back support or carry with handle
- Image #5 – Bag pockets, material, zippers, in grid style (Infographic) – laptop compartment, extra book pocket, polyester, metal zippers
- Image #6 – Professional using it for laptop (Lifestyle) – for work
- Image #7 – Student using it for books (Lifestyle) – for high school student
Once you have your image plan ready, scout for your models, locations, outfits, props, and any other things you may need for the shoot. In order to create aesthetically pleasing and branded pictures, try to achieve a color scheme that will complement your brand colors as well as the colors of your product. In this case, the Helium 10 brand colors are white and blue. I will make sure that my props and outfits are light, neutral colors, or black and gray so that the product stands out. Your props should not overpower your product!
Do I Need a Professional Photographer?
If you own a DSLR or any kind of a professional camera, then guess what? You can do the photography all by yourself, you do not even need an agency to do this part for you!
As for the models, you can either hire models from a modeling agency or use your family or friends. I am going to take pictures of myself (which is also an option!) Remember, it is always best to use models representative of your target audience. For example, if it is a unisex product, try to use all genders in your listing. If it’s a kid’s product then use kids as models! It is absolutely vital to use diversity.
Studies have shown that you are more likely to buy a product if you see someone from your ethnicity in its ad.
I did some in my mini-home studio against a white backdrop and the rest were all in different locations. You can shoot in auto mode but I prefer shooting in manual mode just because I like to customize my camera settings. When you are taking the pictures, make sure you are shooting in RAW as opposed to JPEG. RAW images will produce higher-quality photos.
Now that I have successfully completed the photoshoot, I will filter out any blurry or extra images and send the rest to my editing team. If you do not know how to use Photoshop or do not have the time to edit the pictures yourself (this can be very time-consuming!) you can outsource the editing. There are plenty of freelance platforms, like Fiverr and Upwork, where you can find professional retouchers and editors or you could give it to an agency too.
Check out Helium 10’s Trusted Partner Directory to get in touch with the right photographer!
I will show you the pictures that I have shortlisted below, along with the editing instructions to walk you through my process. You can send out similar instructions to your editor to really customize your listing images to your taste.
Once the images are ready, just go onto Seller Central to upload them to your listing!
Thought Leadership, Tips, and Tricks
Never miss insights into the Amazon selling space by signing up for our email list!
Achieve More Results in Less Time
Accelerate the Growth of Your Business, Brand or Agency
Maximize your results and drive success faster with Helium 10’s full suite of Amazon and Walmart solutions.